
By Valentin Lucet (Website,
GitHub).
Last updated: 03
December, 2023.
The following workshop is inspired from the following resources:
- https://happygitwithr.com/
- https://blog.developer.atlassian.com/a-better-pull-request/
- https://www.nobledesktop.com/blog/what-is-git-and-why-should-you-use-it
We will also use this amazing website as a visual aid.
Preparation
(1) Complete section 1 of the happywithgithr workshop (“Installation”)
(2) Set up HTTPS or SSH protocols by completing part of section 2 of the happywithgithr workshop (“Connect Git, GitHub, RStudio”) If you are having issues with this step, please reach out to me a prior to the training so that I can help you.
This step is important because it allows you to securely connect you to GitHub every time you want to use it from your computer.
- Read the section’s intro
- Read the comparison between https and ssh
- Set up https OR ssh
(3) Learn 5 key things about Git Thanks to Alice Bartlett from the Financial times for this great intro to Git.
Note: This tutorial gives you the choice to either complete it at the terminal or in RStudio.
There is value in being able to do all of this in the command line, because it allows to build a mental model of how git works, which is extremely useful if you do not have access to an UI (this is the case when you are working on a supercomputer for instance). A note on the Git/Github/Rstudio nexus: Rstudio has integrated git in its interface. This can turn out be a lovely thing, but sometimes leads to problems. I advise you to bookmark this troubleshooting guide for later just in case.).
Exercise 1: Once upon a commit…
Let’s start by creating a new directory, this will be our project
directory. Open the terminal on your computer if you are on Mac or Linux
(or the git console if you are on Windows) and use the
mkdir command like below (stands for “make directory”). The
cd command, for “change directory”, allows us to move into
this new directory.
A note on Project-oriented workflows
Git is an example of a tool that requires a project oriented workflow. Git needs to know that files to watch for, and it cannot watch your whole computer (well, in a way, it could, but we’re not kernel maintainers). So git needs to be contained to a folder at a time (a project at a time). This suggests working in such a way that all you need for your project be placed and organized in a project folder. The good news is that RStudio is designed to work like this. To read more about project-oriented workflows, I highly recommend this little post by Jenny Bryan on the tidyverse blog.
At the terminal
cd ~    # Go to your home directory
mkdir gitWorkshop   # Creates a new directory called gitWorkshop in your home directory
cd gitWorkshop        # Moves to inside the new directory
Now that you have a fresh directory, we need to make it a git repository, aka a repo (i.e. a directory in which git is activated and is tracking files). To make this work you need to initialize git. It’s simple:
git init # This initialize git in your directoryInitialized empty Git repository in /home/vlucet/gitWorkshop/.git/In RStudio
To use git in Rstudio, you need to create a new Project. Let’s start by creating our project directory.
- Open RStudio, in the top right corner create a new project

- Select New Directory Note that Version Control is reserved for when you already created a repo on GitHub. We will come back to this later.

- Select New Project

- Choose a name for your repo and a location. Make sure that create a git repository is checked

- You can now look under the git tab, you should see this:

Note: we will come back to what the .gitignore file is later!
Let’s now create a new file, the first file we want to keep track of in this project
At the terminal
We create a file using the touch command:
touch script_1.R # Creates the fileIn Rstudio
Create a new file: go to the menu File => New file => R Script. Make sure to save it with the name script_1.R.
The repo is created and you have created a file, can git see the new file?
At the terminal
With the ls command, which lists everything in your
directory, you can see the file you have created. By editing the empty
file and saving it, we created a change in this file.
At any time, git lets you know if you have a untracked file, thanks
to the git status command.
ls             # This lists the files in the directory. You should see your file listed!
git status # Shows the current status of your repo with regards to git
On branch main
No commits yet
Untracked files:
(use "git add <file>..." to include in what will be committed)
script_1.R
nothing added to commit but untracked files present (use "git add" to track)In Rstudio
No need for the status command in RStudio, the
Git tab shows you in real time the status of your files:
- Files that are untracked are represented by a yellow question mark.
- Files that have been added (see next section) are represented by a green A
- Files that have been tracked and modified are represented by a blue M.
- Files that are tracked but not modified do not show.
- Files that have been deleted are shown with a red D.
By default, Git does not track anything. We need to tell it to do so. Let’s do that now!
At the terminal
From the terminal, we can use the git add command. This
tells git which file you care about and want to start tracking. This is
called Staging the file.
git add script_1.R
git status    # Status now shows, in green, which changes have to be committed
On branch main
No commits yet
Changes to be committed:
(use "git rm --cached <file>..." to unstage)
new file: script_1.RIn Rstudio
In RStudio, this is as simple as “checking off” the file in the Git tab. This is called Staging the file.

While you are at it, make sure to also check the
.gitignore file. What is a gitignore? A
gitignore is a file that lists the file you never want git to track. It
can match certain file names (for instance, .csv or
.tif files). This can be useful in case you need to make
sure certain files (like data files or large files), do not get
added.
Let’s now make sure this new file is registered by git: this is called a commit
At the terminal
We have staged the file. Let’s now take a snapshot of this file with
the git commit command. It is important to add a useful
message to your commit, a bit like a journal entry, so that you can
remember what you committed.
git commit -m "First commit - adding script1" # the -m flag adds a message to a commit[main (root-commit) 03a1fe9] First commit - adding script1
1 file changed, 0 insertions(+), 0 deletions(-)
create mode 100644 script_1.RAnother useful command: git log shows you the recent
commit history.
git log # Git log shows you the historycommit 03a1fe9489631db018d4ae6d39560ce2e5e00ead (HEAD -> main)
Author: VLucet <valentin.lucet@gmail.com>
Date: Wed Apr 8 18:19:53 2020 -0400
First commit - adding script1In Rstudio
In Rstudio, committing is a few clicks away.
- Click on
commiton the top of the file list. This window should appear:

- Before committing anything you need to add a commit message. It is important to add a useful message to your commit, a bit like a journal entry, so that you can remember what you committed.

- Click on commit in order to commit the changes!
Let’s now make some changes to this file and commit them
At the terminal
The code below opens the nano editor. Nano is a simple
command line file editor. Once the file is opened, you will see the
(empty) content of the file.
nano script_1.R # This opens the nano Text editor. Type in what you want. You can then close the editor with
ctrl+X. Make sure to type y for yes and press
enter to save the file. If you do not want to use the
terminal for this (or do not have nano), you can just open the file in a
file editor.
We now need to stage (git add) and commit
(git commit)
git add -A    # This adds ALL (hence the -A) the changes you made to the git index.
              # Your changes are now registered
              # You could also just do git add script_1.R if you wanted to
git status    # Status now shows, in green, which changes have to be committed
On branch main
Changes to be committed:
(use "git reset HEAD <file>..." to unstage)
modified: script_1.RNow let’s commit:
git commit -m "First commit - adding script1" # the -m flag adds a message to a commit[main (root-commit) e07b863] First commit - adding script1
1 file changed, 1 insertion(+)
create mode 100644 script_1.RIn Rstudio
- Open your file in the editor, and add some modifications. Make sure to save it. When you open the git tab, you should see the following:

- Now, Stage the file by checking it.

- Then, make sure you commit once again.

Note: take a look at the history tab in the commit window.
Note that once you have staged a file, you could do more changes, and
you would need to re-run git add to add them to the index.
Those changes not yet fully registered by git, they are like a draft,
not until you commit. When you want to take a snapshot of a file, it
means you are ready to commit that change to the index.
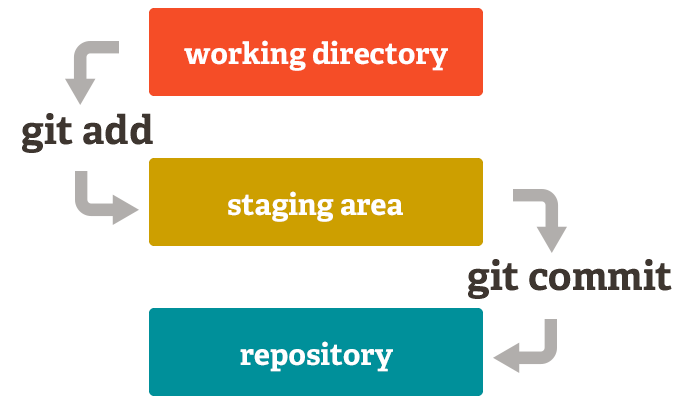
This image summarizes what we have learned so far. Each change in the repository (adding a file, modifying a file, etc…) needs to be staged before it is committed.
Exercise 2: All roads lead to GitHub, how to add a remote
After having created a repo on your local machine (and provided that you have configured git on your computer), you will be able to link your repo to GitHub, an online hub for repositories.
“Linking” can mean multiple things depending on where you start things. If you start on your computer, we call this pushing your local repo to the remote. After pushing, a copy of your repo will live on the GitHub servers and will remain linked to the original copy. The GitHub copy is called a remote.
We first need to create the remote repository on GitHub
The first thing to do is to create the remote:
- Log in, then click on the green folder.

- Give a name to your repo. It’s good practice to the use the same
name than your local git repo (it’s also easier to remember that way!).
Do not add a
README.mdor.gitignore. The repo needs to be empty.

The next thing is to tell your local git that you have created a new remote. You will name this the origin remote. Why origin? Because from the point of view of project development, you want this online repo to be the origin of all future work, and you want the online version to save all that matters!
Let’s now link your local repo with the GitHub “remote”
At the terminal
- Tell git the address of your remote
git remote add origin https:...   # Add here the URL of your git repo,
# for instance https://GitHub.com/VLucet/gitWorkshoptest- You now need to upload your repo to the remote, i.e. to push your commits. The first time you push, you have to tell git that the remote is an upstream branch (more on that later).
git push --set-upstream origin main # This pushes and sets the remote as "upstream"Enumerating objects: 3, done.
Counting objects: 100% (3/3), done.
Writing objects: 100% (3/3), 263 bytes | 263.00 KiB/s, done.
Total 3 (delta 0), reused 0 (delta 0)
To https://github.com/VLucet/gitWorkshop
* [new branch] main -> main
Branch 'main' set up to track remote branch 'main' from 'origin'. git push # If you try to push again,
# it will tell you that everything is up to date!Everything up-to-dateThere you go! you now have a copy of your repo on GitHub. Well done!
In Rstudio
- In Rstudio you have to click to the New Branch button in the git pane, in the top right corner of the pane:
- The dialogue window should open, click on add remote

- Put origin as the remote name. Why
origin? Because from the point of view of project
development, you want this online repo to be the origin of all future
work, and you want the online version to save all that matters! Put the
also address of your repo (for instance for me it is
for instance https://github.com/VLucet/gitWorkshoptest)

- Back to the previous dialogue box, write main as the main branch and make sure to tick the box sync branch with remote.

- You can now push your commits by clicking on the push button. You can go to to your repo to see the changes.

There you go! you now have a copy of your repo on GitHub. Well done! From now on you can continue to add, commit and push your commits.
Exercise 3: Teamwork makes the dream work, or collabaring with git
Git is made for collaboration. In one image, this can be summarized like this:

Form teams of 3 and designate a Repo Owner for this exercise. For this exercise and the next one, we will see the other way to start a repo, by starting it on Github and then cloning it onto your computer.
- Repo Owner only, head over to GitHub to create a new online repository
- This time, make sure to initiate this repository with a
ReadMe file. A
ReadMefile is an important file for a repo, as it is there to describe the purpose of the repo and contains important metadata on that repo.

- Modify the ReadMe directly in GitHub by clicking on the small pencil in the corner. You can edit most files directly in GitHub.

- Type some changes

- Then, scroll down to commit your changes

Let’s now invite people to collaborate on your repo
- To do so, click on Settings then Manage access and Invite collaborators

- Use the username of your group members to invite them to collaborate

We have the repo set up for collaboration, let’s now “clone” the repo
Cloning means “pulling” the repo from the remote, to make a copy on your computer. It is the mirror action of pushing the repo you created locally earlier.
At the terminal
Cloning from the command line is very simple:
cd ~            # Navigate to your home folder again
git clone *URL*     # The URL of the repo created by the repo owner
Well done, you have now set up a team and you are now technically working on the same repo.
In Rstudio
You can clone a GitHub repo from Rstudio:
- Open RStudio, in the top right corner create a new project
- Select Version Control, which is is reserved for when you already created a repo on GitHub.
- Select Git. Subversion is listed here as another version control software supported by Rstudio.

- Fill the different fields as such: for the “Repository URL”, paste the URL of the repo (of the type ‘https://GitHub.com/VLucet/GitWorkshop.git’), which should update the field “Project directory name”. Finally, select where on your computer you would like to clone the repo (the Home directory or your Documents directory for instance).

Exercise 4: (Do The) Push and Pull, or the git workflow
In this next exercise, we are going to use the repo you cloned at the previous exercise. We are now going to do the exercise of pushing and pulling to update the GitHub repo with changes we make locally.
At the terminal
The first step is to make sure you are up to date with the version of
the repo that is on GitHub. Navigate to the cloned repo an use the
fetch command.
git fetch # Fetch compares your local version with the remote version but does not apply the new changes (if there are any)Everything should be up to date, so all good.
In Rstudio
- In Rstudio, the first step is to create an Rstudio project within the folder that you cloned from GitHub. As a reminder, this is the only way to use git in the Rstudio context To do so, navigate to the R box in the top right corner and click on “New Project”

- Select “Existing directory”, we will choose the directory you cloned from GitHub.

- Browse for your directory (it should be in your home folder) and create the new project.

Let’s now learn how to makes changes in this repo and sync them with GitHub
At the terminal
The next step is for one of the team members (other than the repo owner) to make a change. Make a change to the ReadMe file for instance.
nano README.md # Reminder: nano is the console editorThen, add, commit and push those changes:
git add -A              # Once again, add all the changes
git commit -m "modified the README" # Always add a useful message
[main 58c8cb7] modified the README
1 file changed, 1 insertion(+), 1 deletion(-)git push origin main # Push it!Enumerating objects: 5, done.
Counting objects: 100% (5/5), done.
Delta compression using up to 12 threads
Compressing objects: 100% (2/2), done.
Writing objects: 100% (3/3), 313 bytes | 313.00 KiB/s, done.
Total 3 (delta 0), reused 0 (delta 0)
To github.com:VLucet/gitWorkshop.git
a992c9a..58c8cb7 main -> mainIn Rstudio
- Open the ReadMe in the editor and modify it. Save the changes. The git pane should look something like that:

- As in the previous exercises, you can commit and push the new change. You have now pushed new changes to the repo, but the rest of your team is now behind.
One group member has made changes to the repo, let’s make sure the rest of the time is up to date as well!
At the terminal
Now, two of the team members are not in sync with the changes. These
people can see it with a fetch. Below I cannot show the
outputs but you should be a little more familiar with these by now.
git fetch   # This will download the changes pushed by your team member
git status  # Always good to run status once in a while. Here it will tell you that you are 1 commit behind!
You are 1 commit behind! To remedy to this, it is as simple as pulling the changes in your local repo.
git pull origin main # Nice! Git will print a nice summary with green + and red -. How cute. Well done! You now know how to push and pull, fetch and status your way around a shared repo. You’re the best.
In Rstudio
- In order to bring yourself back in sync with the changes pushed by your teammate, you just need to pull those changes by clicking on the blue pull arrow in the git pane.
Well done! You now know how to push and pull, fetch and status your way around a shared repo. You’re the best.
What if two people commit changes at the same line one after the other? Its a conflict (see next exercise)
Exercise 5 Git of war, or conflicts and how to resolve them
Now, let’s do this again but a little differently. One person in the
group to not have edited the README yet should do it now on
their machine. Please add and commit but do not push your
changes yet (see in the previous exercises.
Now, repo owner will go on GitHub and change the file. There are many types of files that can be edited directly on GitHub, and the README file is one of them. For this exercise, please change the same line than the previous person. Commit this change to the repo.
Now, the person who changed the file on their machine will do the pulling procedure:
At the terminal
At the terminal, do the following:
git fetch   # This fetches the changes
git status  # WOW! Status says that the commits are different... this might cause a problem
git pull    # There is now a "conflict" and you need to resolve it
In Rstudio
In Rstudio, try to push your changes. You should get a message explaining that you cannot do so. Instead, pull your changes and you will receive a message stating that a conflict was created.
How can one resolve a conflict?
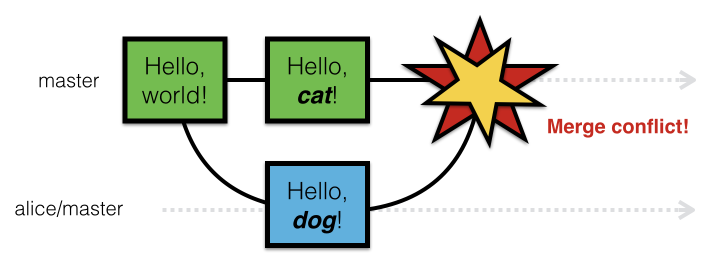
You’ve created a conflict. A conflict typically happens when you have committed a local change and are pulling a commit from remote that was made on that same line of code you just changed. See it illustrated below:
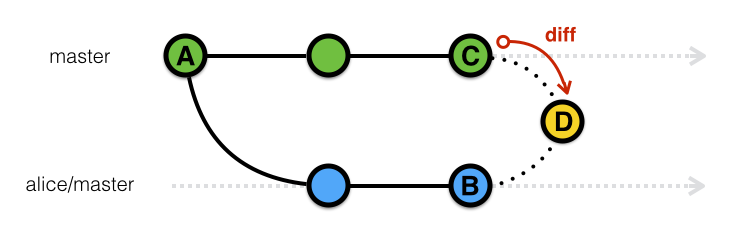
Git doesn’t know which changes to keep and which one to throw away. We need to make a choice: we call that doing a “commit merge”. As illustrated below, git will compare the two streams of information:
At the terminal
You can use the nano editor to open the conflicted
file.
nano *file* # Opens file in nano In Rstudio
Simply open the conflicted file in the editor.
When you open the conflicted file you will see code that is enclosed
within <<<<<<< HEAD and
=======. This corresponds to your local version of this
line of code. Then between ======= and
>>>>>>> 3f74688ab... is the version
corresponding to the commit (with the hash 3f74688ab...)
that you pulled from remote. You need to edit the file so that these
various things, <<<<<<< HEAD and
======= and
>>>>>>> 3f74688ab... are no longer
there. It will look like this:
<<<<<<< HEAD
Fight Club is the best movie ever
=======
In fact, Back To The Future is the best movie ever
>>>>>>> main
You can choose to keep either of the changes or to keep both. all
that matters is that the elements
<<<<<<< HEAD ; =======
and >>>>>>> main are now longer in the
file.
Once you have decided what to keep, it is time to commit your change, and merge it with the remote repo.
At the terminal
git add -A              # Once again, add all the changes
git commit -m "fixed the conflict"  # You fixed the conflict, better put a message indicating it!
git push origin main            # Push it!
git status              # All is good!
In Rstudio
Simply add and commit the final version of the corrected file. You will see a message about a git merge.
Well done! Now the other team members will need to pull down this new commit merge. You’ve learned how to deal with conflicts! It is sometimes easier to deal with conflict in a git client such as GitHub Desktop or Git Kraken. Even better is to avoid conflicts from even happening by branching.
Exercise 6: The tree of git, or the basics of branching
A great way to make conflicts avoidable is to use the magic of branching. Branches are like alternate timelines that allow you to work on a snapshot of the repo at a given time. You start by “branching out of the main branch”: this copies the current version of the repo and allows you to make changes on a separate “branch”.
The first thing is to create the branch:
At the terminal
git branch mynewbranch # This simply creates the new branchIn Rstudio
- Click on the new branch button in the top right corner of the git pane.

- Name the branch and create it. Make sure the remote origin is checked.

The branch is created, but you are still on the main branch. To be able to switch to the new branch, we need to “checkout’ the branch.
At the terminal
git checkout mynewbranch # This makes you switch to the new branchSwitched to branch 'mynewbranch'git status # You are now on the new branchOn branch mynewbranch
nothing to commit, working tree cleannote: there is a shortcut to do those 2
commands in one line: git checkout -b mynewbranch
In Rstudio
Rstudio automatically checks out the new branch, and publish it to the remote, when your create it. You can switch branches very easily by using the drop down menu in the git pane (find it by clicking on whatever branch name is shown in git pane).
You are now on the new branch! This branch is only on your local machine for now (unless you use Github). Let’s add some changes and then commit and push so that you branch is saved on the remote!
At the terminal
# Do some changes in your repo! They will only be part of the commit history of your branch
git commit -a -m 'added some changes to the new branch'  # Another shortcut to add and commit at the same time!
[mynewbranch 92b76fb] added some changes to the new branch
1 file changed, 1 insertion(+)git push origin mynewbranch # Pushing to the new branch - you can also just type in "git push"Enumerating objects: 5, done.
Counting objects: 100% (5/5), done.
Delta compression using up to 12 threads
Compressing objects: 100% (2/2), done.
Writing objects: 100% (3/3), 338 bytes | 338.00 KiB/s, done.
Total 3 (delta 0), reused 0 (delta 0)
remote:
remote: Create a pull request for 'mynewbranch' on GitHub by visiting:
remote: https://github.com/VLucet/gitWorkshop/pull/new/mynewbranch
remote:
To github.com:VLucet/gitWorkshop.git
* [new branch] mynewbranch -> mynewbranchIn Rstudio
Modify the ReadMe again and push the changes to the new branch.
Now, while one of the team member is adding commits to their new branch, someone else should keep adding changes to the main branch. Once this is done, it is time to merge the new branch with the main branch.
At the terminal
Merging means doing a “pull request”: you are pulling the new branch into the main branch. You therefore need to checkout the main branch and then pull the new branch into the main.
git checkout main # You've switched to the main branchSwitched to branch 'main'
Your branch is up to date with 'origin/main'.git merge mynewbranch # this merges (opens a pull request and checks it against the main)Updating 58c8cb7..92b76fb
Fast-forward
script_1.R | 1 +
1 file changed, 1 insertion(+)git push # this pushes the merging of the two branches Total 0 (delta 0), reused 0 (delta 0)
To github.com:VLucet/gitWorkshop.git
58c8cb7..92b76fb main -> main
In Rstudio
You cannot do this in Rstudio, but you can do this on GitHub (DEMO).
DEMO: Gitkraken
DEMO of the git client GitKraken if time permits. Otherwise, see this video. This video actually also covers more advanced topics, but you can use it to get a feel for where the interface to find the buttons for adding (staging), committing and pushing/pulling.